Generate Open Graph images for your static Next.js site
UPDATE: Since the blog post has been written, there are now better options to generate OG images. The post below is still an okay way to generate OG images, but maybe you want to checkout @vercel/og for an easier option. You cean learn more at the documentation.
You probably know those fancy images that you see on Twitter or Slack when someone shares a link to a website. The information that you see is meta tags stored inside HTML. They even have a fancy name and belong to the Open Graph protocol.
Here is an example from my blog’s homepage:
<meta property="og:title" content="Home" />
<meta property="og:description" content="Welcome to my blog!" />
<meta property="og:type" content="website" />
<meta property="og:url" content="https://phiilu.com/" />
<meta
  property="og:image"
  content="https://phiilu.com/images/og/840e64ab9334b9d5d555c85e0d073179.png"
/>
Those meta tags are very easy to put onto your site, but the image one can be a bit tricky because we need real images that are different for each page we have!
In this post, I want to show you how you can design your own images and generate them on build time for your static Next.js site!
The principle is very simple. We have a webpage where we generate an HTML site that looks like the OG image we want to display when somebody shares our site. Next, we use Next.js build process to crawl this site, generate an image of the webpage, and save it somewhere, where Next.js can access it.
So let’s start with building our OG Image using CSS!
Create your OG image page
In my case, I generated a separate app with the only purpose of generating the images and displaying them. You could also add the functionality we are going to write into your existing app, but make sure to deploy the code we write in this section first!
What we are going to write is basically a webpage that takes some query parameters and generates the image we want. For example, if we access our app with this URL (go check it out)
https://og-image.phiilu.com/phiilu.com/post?title=Hello%20World&url=https://phiilu.com/hello-world
we get a webpage which generates this image:
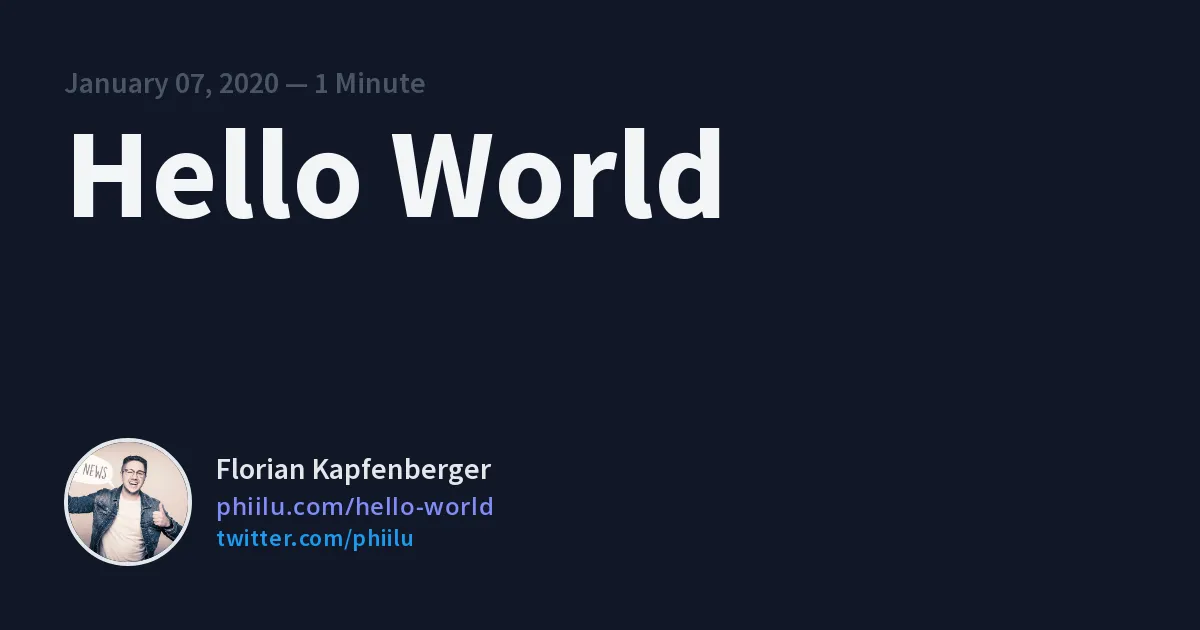
So all you need is a simple route and a component that looks similar to this one.
import { useRouter } from 'next/router';
import GoogleFonts from 'next-google-fonts';

function getFontSize(length) {
  if (length > 32) {
    return `text-7xl`;
  }

  return `text-9xl`;
}

// const twitter = <svg className="inline-block w-8 h-8" xmlns="http://www.w3.org/2000/svg" viewBox="0 0 248 204"><path d="M221.95 51.29c.15 2.17.15 4.34.15 6.53 0 66.73-50.8 143.69-143.69 143.69v-.04c-27.44.04-54.31-7.82-77.41-22.64 3.99.48 8 .72 12.02.73 22.74.02 44.83-7.61 62.72-21.66-21.61-.41-40.56-14.5-47.18-35.07a50.338 50.338 0 0022.8-.87C27.8 117.2 10.85 96.5 10.85 72.46v-.64a50.18 50.18 0 0022.92 6.32C11.58 63.31 4.74 33.79 18.14 10.71a143.333 143.333 0 00104.08 52.76 50.532 50.532 0 0114.61-48.25c20.34-19.12 52.33-18.14 71.45 2.19 11.31-2.23 22.15-6.38 32.07-12.26a50.69 50.69 0 01-22.2 27.93c10.01-1.18 19.79-3.86 29-7.95a102.594 102.594 0 01-25.2 26.16z" fill="#1d9bf0"/></svg>;

// Example URL: http://localhost:3000/phiilu.com?title=Hello%20mein%20Name%20ist%20Florian!&url=https://phiilu.com/hello-world
const PhiiluCom = () => {
  const router = useRouter();

  const searchParams = new URLSearchParams(router.asPath.split(/\?/)[1]);
  const link = searchParams.get('url');

  if (!link) return null;

  const linkURL = new URL(link);
  const title = searchParams.get('title');
  const date = searchParams.get('date');
  const readTime = searchParams.get('readTime');

  return (
    <>
      <GoogleFonts href="https://fonts.googleapis.com/css2?family=Open+Sans:wght@300;400;600;700&family=Source+Sans+Pro:wght@300;400;600;700&display=swap" />
      <div
        className="relative flex flex-col justify-between p-16 text-gray-100 bg-gray-900 shadow-md"
        style={{ width: 1200, height: 630 }}
      >
        <div className="max-w-screen-lg space-y-2">
          {date && readTime && (
            <p className="text-3xl font-semibold text-gray-600 font-source-sans-pro">
              <span>{date}</span> — <span>{readTime}</span>
            </p>
          )}
          <h1
            className={`${getFontSize(title.length)} font-bold text-gray-100 font-source-sans-pro`}
          >
            {title}
          </h1>
        </div>
        <div className="flex justify-between">
          <div className="flex items-center space-x-6">
            <img
              src="https://pbs.twimg.com/profile_images/1220392920538386432/NuYyL5b5_400x400.jpg"
              alt="Florian Kapfenberger"
              className="flex-none w-32 h-32 border-4 border-gray-200 rounded-full handsome"
            />
            <div className="flex flex-col gap">
              <p className="mb-1 text-3xl font-semibold text-gray-200 font-source-sans-pro">
                Florian Kapfenberger
              </p>
              <p className="text-2xl font-semibold tracking-wide text-indigo-400 font-open-sans">
                phiilu.com<span className="path">{linkURL.pathname}</span>
              </p>
              <p
                className="text-2xl font-semibold tracking-wide font-source-sans-pro"
                style={{ color: '#1D9BF0' }}
              >
                twitter.com/phiilu
              </p>
            </div>
          </div>
        </div>
      </div>
    </>
  );
};

export default PhiiluCom;
Of course, I am using Next.js here as well. I am using Tailwind, but you can use plain CSS or any other framework to style the page.
You can style your image like you want to, the only important part is that your OG image has the right dimensions. I am using 1200 for the width and 630 as the height as this is what most sites recommend.
To be fair those are not the perfect values for Twitter cards, but there are many different recommendations out there. Maybe in the future, I might generate different formats for different services.
To make the image dynamic I am using URLSearchParams to get the values from the URL query. If you don’t know what URLSearchParams is you can check out my blog post where I explain how it works.
Now that your design is done and you are happy with it, you need to deploy your app somewhere. If you are using Next.js I would recommend Vercel or Netlify.
You can check out the full source code on GitHub if you want.
The OG image generator function
Now that we have our little OG image app ready, we can finally continue and generate our OG images!
First, create a new file where you want to put your code. I chose to put mine into a lib folder and named the file getOgImage.js.
We basically need to do 3 things:
- check if we already have the OG image and if yes just return the location
- if not, we need to open the browser with the correct query parameters and take a screenshot of the page
- store the screenshot where Next.js can use it
All these steps translate into this code:
const playwright = require('playwright-aws-lambda');
const { createHash } = require('crypto');
const fs = require('fs');

async function getOgImage(path, baseUrl = 'https://og-image.phiilu.com') {
  if (process.env.NODE_ENV === 'development') {
    return 'og image will be generated in production';
  }

  const url = `${baseUrl}${path}`;
  const hash = createHash('md5').update(url).digest('hex');
  const browser = await playwright.launchChromium({ headless: true });
  const ogImageDir = `./public/images/og`;
  const imagePath = `${ogImageDir}/${hash}.png`;
  const publicPath = `${process.env.BASE_URL}/images/og/${hash}.png`;

  try {
    fs.statSync(imagePath);
    return publicPath;
  } catch (error) {
    // file does not exists, so we create it
  }

  const page = await browser.newPage();
  await page.setViewportSize({ width: 1200, height: 630 });
  await page.goto(url, { waitUntil: 'networkidle' });
  const buffer = await page.screenshot({ type: 'png' });
  await browser.close();

  fs.mkdirSync(ogImageDir, { recursive: true });
  fs.writeFileSync(imagePath, buffer);

  return publicPath;
}

export default getOgImage;
Let’s take a deeper look into what some of these lines mean.
async function getOgImage(path, baseUrl = 'https://og-image.phiilu.com') {
...
}
Our function will take 2 parameters. The first one is the path with the query parameters that will generate the OG image like /phiilu.com?title=Hello%20World&url=https://phiilu.com/hello-world. The second one is optional, which is the baseUrl of our OG image app.
if (process.env.NODE_ENV === 'development') {
  return 'og image will be generated in production';
}
During the development of this feature, you might want to comment this block otherwise, the images are only generated in production. This is usually what you want because it can slow down your development workflow.
const url = `${baseUrl}${path}`;
const hash = createHash('md5').update(url).digest('hex');
const ogImageDir = `./public/images/og`;
const imagePath = `${ogImageDir}/${hash}.png`;
const publicPath = `${process.env.BASE_URL}/images/og/${hash}.png`;
Here we define our OG image url with the two parameters from the function.
Then we create a hash of this url. The hash will be the filename of the image and lets us decide if we already generated an image for this request or not.
ogImageDir is the directory where we will store the OG images for Next.js.
imagePath is the file path where we will save the image.
publicPath is the absolute URL where our image will be available and the content value for the <meta name="og:image" /> tag.
try {
  fs.statSync(imagePath);
  return publicPath;
} catch (error) {
  // file does not exists, so we create it
}
Here we use the fs.statSync method to check if we already have an image for the requested URL. If the file already exists we will return the publicPath otherwise the method will throw an error and we can continue with our logic.
const browser = await playwright.launchChromium({ headless: true });
const page = await browser.newPage();
await page.setViewportSize({ width: 1200, height: 630 });
await page.goto(url, { waitUntil: 'networkidle' });
const buffer = await page.screenshot({ type: 'png' });
await browser.close();
This is probably the most interesting part. Here we are using Playwright to control a headless browser.
Playwright is a great library to scrap webpages and automate your browser!
So we use Playwright to create a new empty page in the browser and set the viewport to exactly the dimensions we have specified in our OG image app. Next, we will browse to the url and wait until the network has become idle. Now we use the very cool method screenshot to generate a screenshot of the page and save the buffer inside a variable. When we are finished we can close the browser.
fs.mkdirSync(ogImageDir, { recursive: true });
fs.writeFileSync(imagePath, buffer);
recursive: truemeans if the directory already exists it will not be created again. This works exactly like the commandmkdir -p DIRin the terminal
Last but not least we create the ogImageDir and create a new file with the contents of the saved buffer.
DONE! We have successfully generated the OG image and saved it where Next.js can serve it!
Generate the OG images during the build
The last thing that is missing is that we call the function inside our pages.
Go to a page where you want to generate the OG image and call the function inside the getStaticProps function.
This is what my getStaticProps in the [slug].js file inside the pages folder looks like:
export async function getStaticProps({ params: { slug } }) {
  const post = await contentful.getEntry('post', slug);
  const ogImage = await getOgImage(
    `/phiilu.com?title=${post.title}&url=${process.env.BASE_URL}/${slug}`
  );

  return {
    props: { post, ogImage }
  };
}
Now you have the ogImage prop available inside the page component and we can render the <meta /> tag inside the Head component.
import Head from 'next/head';

const PostDetails = ({ post, ogImage }) => {
  return (
    <>
      <Head>
        <meta name="og:image" content={ogImage} />
      </Head>
      <Layout>{/* ... */}</Layout>
    </>
  );
};
some parts of the component have been skipped, to make the example easier
My blog at phiilu.com is open-source, if you want you can have a look at the whole repo here.
Conclusion
That’s all you need to generate dynamic OG images and store them locally.
This was not my first approach to serve dynamic OG images. In my first approach, I had a serverless function that would take a screenshot of the page and returns the image in a Base64 string. I basically copied the idea from Wes Bos. You can watch the video here.
It worked well for some time, but I was not happy with the performance. Sometimes the function took way too long to return the image and I also had some problems where the function was removed after deployment via a webhook on Netlify.
This is why I searched for another solution. My next thought was to do the same logic but store the images at Cloudinary. As soon as I had finished it, I was thinking if I could skip the Cloudinary altogether and store the image locally. After some research, I discover I can just store the image inside the ./public folder and Next.js can find it without any problem. I love the idea of serving the OG images from the same Vercel CDN that the Next.js app is on.
After writing this post I discovered that Vercel has built https://og-image.vercel.app/, which will solve the same problem, but differently. For now, I will continue using my custom brewed solution but I might check it out for a future project.